September 18, 2019 • 2 min to read
Pulling Github repositories data into Gatsby using GraphQL
Add your open source projects to Gatsby with GraphQL using the gatsby-source-github-api package.
gatsby, github, javascript
Introduction
In this post we will learn how to pull Github repositories into Gatsby-based website with GraphQL using the gatsby-source-github-api.
1. Configuring the plugin
The first step is add the plugin as a dependency:
npm i gatsby-source-github-api --save

# or

yarn gatsby-source-github-api
Then, add the plugin configurations in the gatsby-config.js file:
// In your gatsby-config.js
plugins: [
  {
    resolve: `gatsby-source-github-api`,
    options: {
      // token: required by the GitHub API
      token: someString,

      // GraphQLquery: defaults to a search query
      graphQLQuery: anotherString,

      // variables: defaults to variables needed for a search query
      variables: someObject,
    },
  },
]
The next sesions we will learn how to generate the Github token and create our first query in GraphQL to fetch the repositories.
2. Generate Github Personal Access Token
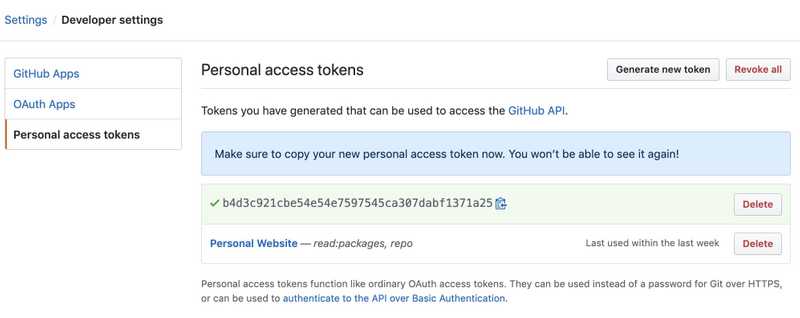
Personal access tokens function like ordinary OAuth access tokens. They can be used instead of a password for Git over HTTPS, or can be used to authenticate to the API over Basic Authentication. So, for use the plugin we will need generate one at Github page. We can do that following these steps:
- Select your profile in the Github header and pick the `Settings` option.

- Go to `Developer settings` and `Personal access token`. When you there click in `Generate new token` button.

- Lastly, you should fill the fields `Note` and `Select scopes` based in your needs. Then, click in the button `Generate Token`.

Copy your generated token and add it in your plugin configuration:
// In your gatsby-config.js
plugins: [
  {
    resolve: `gatsby-source-github-api`,
    options: {
      // token: required by the GitHub API
      token: 'b4d3c921cbe54e54e7587545ca307dabf1371a25',

      // GraphQLquery: defaults to a search query
      graphQLQuery: anotherString,

      // variables: defaults to variables needed for a search query
      variables: someObject,
    },
  },
]
Tip: Always add your tokens in a `.env` file. To learn more please look this link.
3. Add your GraphQL query
GitHub chose GraphQL for our API v4 because it offers significantly more flexibility for our integrators. The ability to define precisely the data you want—and only the data you want—is a powerful advantage over the REST API v3 endpoints. GraphQL lets you replace multiple REST requests with a single call to fetch the data you specify.
Github provides an explorer using the GraphiQL IDE that enables you create the queries that we will use in the plugin. You can also check the GraphQL API Documentation.
For this post we will fetch my repositories ordered by the number of starts, i.e., the respositories with more number of starts will be the first ones. The query will be like:
{
  "graphQLQuery": `query ($author: String = "", $userFirst: Int = 0) {
    user(login: $author) {
      repositories(first: $userFirst, orderBy: {field: STARGAZERS, direction: DESC} privacy: PUBLIC, isFork: false) {
        edges {
          node {
            name
            description
            url
            forkCount
            stargazers {
              totalCount
            }
          }
        }
      }
    }
  }`,
  "variables": {
    "userFirst": 2,
    "author": "LucasBassetti"
  }
}
Replacing the variables in the query we will have some like:
{
  graphQLQuery: `query {
    user(login: LucasBassetti) {
      repositories(first: 2, orderBy: {field: STARGAZERS, direction: DESC} privacy: PUBLIC, isFork: false) {
        edges {
          node {
            name
            description
            url
            forkCount
            stargazers {
              totalCount
            }
          }
        }
      }
    }
  }
}
It means for the user LucasBassetti I want the properies name, description, url, forkCount and stargazers.totalCount of the 2 repositories with more number of starts. As result we will have:
{
  "data": {
    "user": {
      "repositories": {
        "edges": [
          {
            "node": {
              "name": "react-simple-chatbot",
              "description": ":speech_balloon: Easy way to create conversation chats",
              "url": "https://github.com/LucasBassetti/react-simple-chatbot",
              "stargazers": {
                "totalCount": 952
              },
              "forkCount": 297
            }
          },
          {
            "node": {
              "name": "react-css-loaders",
              "description": ":o: A collection of pure CSS React loading components",
              "url": "https://github.com/LucasBassetti/react-css-loaders",
              "stargazers": {
                "totalCount": 340
              },
              "forkCount": 24
            }
          }
        ]
      }
    }
  }
}
3. Creating your custom component
Plugin configured, we are now able to create our custom component. In the Gatsby GraphiQL IDE we will have 2 new properies: allGithubData and githubData. These props will enable us to fetching the github data configured in the plugin. Example:
query {
  githubData {
    data {
      user {
        repositories {
          edges {
            node {
              name
              description
              stargazers {
                totalCount
              }
              url
              forkCount
            }
          }
        }
      }
    }
  }
}
Lastly, you just need create your component using the data. In my case it was used to create my Projects page (you can check the code here). And the result was:
react-simple-chatbot
Easy way to create conversation chats
react-css-loaders
A collection of pure CSS React loading components
Conclusion
In this post we learned how to use the gatsby-source-github-api to pull Github data using GraphQL. First we created a personal access token in Github to use its GraphQL API. Than, we created a query to fetch repositories ordered by starts from an user. With this data we created a react component to present the results.
Something Missing?
This project is open-source, so if something is missing or if you found some part confusing, please submit a pull-request in the Github repository for this post with your suggestions for improvement. It is a simple and effective way to contribute to the web development community.